Thursday, July 14, 2011

Emma's 8th birthday party

Emma turned 8 on June 27th.  We decided this year to not actually have a "party", and instead to just take her to Chuck E Cheese.  So, on her actual birthday, we just had a small cake with dinner and let her open a present or two. I made her cake myself, and I think it turned out great considering.


I guess the only thing that really mattered is that she liked it, and she did.

On Saturday, July 2nd, we headed to Tallahassee with my Mom and Dad to meet my Aunt, Uncle, Cousin, and her two kids at Chuck E. Cheese.  We figured the kids would have a blast playing the games and being together. The kids and the adults played lots of games and won lots of tickets. After all the playing was done, we let Emma open her presents.  She got lots of cool things! We didn't take many pictures, but here are a few that we did get.


Yes, that is an iPhone that you see, but, before anyone freaks out and thinks that I have lost my mind giving an 8yr. old a phone, let me explain. I just recently upgraded my iPhone from the original one, which you see Emma holding, to a new iPhone 4.  Emma loves to play on our phones, so when I got my new one, I decided to just hold on to my old one, and reinstall it so that she could use it as an iPod touch.  This basically means that she can only use it when she is connected to Wi-Fi and that there is no phone service.  We were able to find her an app that she can use to text us and other family members that doesn't cost anything.  By having these features only available when she is connected to either our home Wi-Fi or my parents, we are really able to keep an eye on her, while at the same time, allowing her to have fun.  So far it's working out great, and there haven't been any major issues.  

This was our group!  Me, Ike, Emma and Madeline aren't in the picture, we forgot to get a shot of us I guess.  It was really nice to be able to get the kids together to play.  After all the fun, we had Olive Garden for dinner!  Yummy!  

Thanks so much Lightfoots for taking the time and money to drive all that way to meet us!  Emma had a great day!


Photobucket

Thursday, July 7, 2011

Girl's Bathroom Makeover

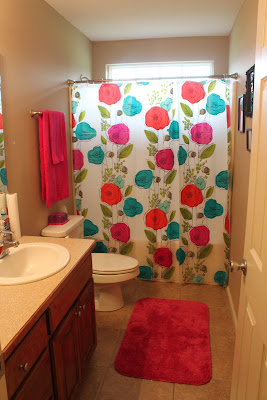
Ever since Emma was little, our guest bathroom has been decorated in a Disney Princess theme.  So, that means at our last house and this house, our guest have had to use the bathroom with Cinderella, Snow White and Sleeping Beauty watching them. I have been wanting to re-do the bathroom, but in true Leslie style, I just couldn't decide what to do.  All I knew is that I had had enough of the princesses. So, last month, with Emma's birthday approaching, and no real ideas on what we were going to get her, I decided that part of her gift would be giving her bathroom a big girl makeover.  After all, she is 8 now, and was really over the princess theme as well, AND, she has so many toys that I really just didn't want to add to the growing toy problem we already have. I had already planned on cleaning off and reinstalling my old iPhone for her to use as an iPod touch, so along with the bathroom makeover, I thought she would be pleased, and she totally was!  She told me that she LOVED her new bathroom.

I would have loved to paint the bathroom, but that just wasn't in the budget this time around, so I found a cute curtain that I liked at Target, and built the bathroom around that. Madeline and Emma will be sharing this bathroom, so I wanted to make it friendly for both of them. I think the bright colors and flowers were just the thing!


 Notice the little blur underneath the doorknob...Madeline was trying to get in all the pictures. She kept running into the room and saying "Cheese". Also, please excuse that white blob to the right of the mirror. I had to wait for the nail hole filler to dry before I could hang her hand towel ring back up.

I am still working on getting these frames filled, but at least they are hung and ready when I get the photos printed. The E & M frames are just temporary.  I am hoping to have those initials redone in a cute button craft I saw on Pinterest, but I just haven't had the time to sit down and plan it out yet, so these will have to do for now.

The frame in the top middle was a frame that I got from grandma's house.  She had a frame for each of her 3 daughters with a picture of their family in it.  It was a brown wood look, but I painted it black to match the others.  I'm so glad I can incorporate items that have sentimental value into my decorating.  Here's a picture of the frame in progress, to give you can idea of what it looked like before.


The counter is also a work in progress, since I think there needs to be something in the corner, like some flowers in a vase or something.  I have to be careful with my decorating in this room, since Emma is really rough on things. Whatever it is, is gonna have to be durable and not easily broken. Anyone have any ideas?

Now that my chairs have new covers, my dining room and kitchen have curtains, and the girl's bathroom is looking better, it's on to my next project...stripping and painting my grandma's 1949 Lane Cedar hope chest that my mom rescued from my grandma's shed before her house was sold last week.  Right now it looks pretty rough, since it's a faded green color and had been living in that shed for years.  I can't wait to get started on it. I think she would be so happy and excited that I am going to be giving it a new life.

Wednesday, July 6, 2011

Drop Cloth Curtains

Since we moved into our house 4 years ago, my living room and dining room windows have been bare with the exception of the blinds we put up the week we moved in.  I am really horrible at decorating and have just always felt like I had no idea what I was doing.  So, when we moved in, we had blank walls for months, dare I say over a year maybe? I just didn't know what to do, and these windows were no exception.

After all of my pinterest pinning and blog reading I came across another use for those awesome Home Depot drop cloths.  Curtains!  So, off to Home Depot I went again, and purchased more drop cloths, even buying the last one they had in the 6ft x 9ft size.

I threw them into the wash with some detergent and fabric softener. I figured that at some point in the future I was going to want to take them down and wash them, and wanted to see how the fabric was going to act after being washed. Once they were washed and dried, I got to work on hanging the rods.  Ok, Ok...Ike did most of the work with the rods, but I was the supervisor and screw holder.

I found the cheapest, decent looking cafe rod that I could find, which happened to be at Target. Since I wasn't planning on sewing the drop cloths, I also bought the curtain rings/clips. I just held the drop cloths up to the rod to see how long I wanted them, then just folded the top of the cloths over so they would hang at the right length, and clipped them onto the clips.  Did that make any sense? Ha!

Anyway, I think these pictures of the finished product will clear things up.

First up is the living room:


Now for the dining room:


I couldn't be happier with how these turned out!  I love them! They really have changed the whole feel of my living room.  I really wish I had taken some before photos, but I completely forgot.  My dining room still needs some major help in the decorating department, but at least I have curtains! I do have some ideas floating around my head for the dining room, but just haven't really decided on anything yet. I have a large open wall that needs help, as well as that corner shelf. I had big plans to paint it to match our trim in the house, but haven't done anything with it yet.  I also have some chalkboard paint that I plan to use to spruce up the canisters that are on the shelf, but I need to do a bit more research on painting glazed pottery before I attempt that.

Next up: Emma & Madeline's bathroom gets a facelift! Check back later this week for those pictures!

Photobucket

Tuesday, July 5, 2011

Dining room chair makeover

For months now, I have been staring at my dining room chairs and wishing I could recover them. Children, a cat and white/cream upholstered dining room chairs just don't go together. See how nasty they were? Yuck!  I was embarrassed for anyone to come over and sit in these nasty things! I tried cleaning them before, but nothing really worked as well as I thought it should have.


I'd looked for fabric to recover them before, but the decorator weight fabric that I needed was pretty expensive, and with 6 chairs to cover, I just couldn't spend the money.  So, after reading tons of home decorating blogs and seeing slipcovers being made out inexpensive drop cloths, I had an idea.  If they can make slip covers out of drop cloths, then I'm sure I can re-cover my chairs with one!  So, off to Home Depot I went. (They have the best drop cloths, since theirs don't have seams and are already hemmed on all 4 sides)  I bought a $10 drop cloth, a staple gun, and some staples and got to work. 

First I took the seats off the chairs and measured them to see how big of a piece I would need for each chair seat.


Luckily one 6ft x 9ft drop cloth was enough to cover all 6 of my chairs.  I got to working measuring and cutting out the pieces.  I was able to get 8 pieces out of the drop cloth, so I had 2 extras that I saved in case I need them later. The cutting wasn't too bad, and I folded over the fabric to make it double layered, so I could cut down on the number of cuts I had to make.


After all the cutting was done, I took each piece of fabric, and "wrapped" each seat with it. I used the staple gun to staple the fabric to the back of the seat. Sorry I didn't take a picture of this part.  I was on a roll, and totally forgot. 


Once they were all wrapped and stapled, I took each seat and screwed it back onto the frame. 


 Ta da! 

I am so pleased with how they turned out, and can't believe I hadn't thought of this idea sooner.  What a cheap, quick and easy fix! It took me about 2 hours from start to finish. Now I just need to figure out how to decorate my un-decorated dining room. Anyone have any suggestions for the big empty wall behind the table? The one with the light switch right in the middle of it? ha!


Stayed tuned!  More home decorating projects coming this week!
Photobucket

Monday, July 4, 2011

Happy 4th of July!

Happy Independence Day! Thank you to all of those who have or are currently fighting for the freedom we enjoy.  Here are the girls are decked out in their 4th of July attire thanks to my mom.


We had a pretty easy going day and went to visit Ike's mom, then did some grocery shopping. We decided not to go to the fireworks, but we did a few sparklers in the backyard with the girls once it got dark.  They had a great time.

Look for some posts this week on a few home decorating projects that I have been working on.  Thanks to Pinterest and many, many home decor/crafting blogs, I have seen so many neat decorating ideas lately, so I decided to try my hand at a few of my favorite ideas.  So, make sure to check back this week to see what all I got accomplished.

Photobucket